

Are you looking for gas springs for your application? Perhaps you own a caravan and want to easily lift and lower the bed? Or do you own a trap door which needs to be opened and closed frequently? Or maybe you are struggling with opening and closing the hood of your pickup truck. Whatever your application is, Gasspringsshop.com is the answer to all your problems regarding gas springs and mounting parts. We have a wide product range and we also have many detailed gas spring installation guides. This way you can easily install your gas springs and you can be sure that you can’t make any mistakes. Want to know more about the gas spring installation? Then read on, we will tell you exactly how to install your gas springs – in 5 easy and quick steps.
Step 1 & 2: Basics of the gas spring installation
Before you can start with the gas spring installation, you first need to know how to order the right gas springs for your application. After all, no application is the same and therefore every application requires a different gas spring. For example, the length, Newton force and material (steel or stainless steel) of the gas spring can differ per application. And these are just a few examples! Fortunately, Gasspringsshop has the solution for you!
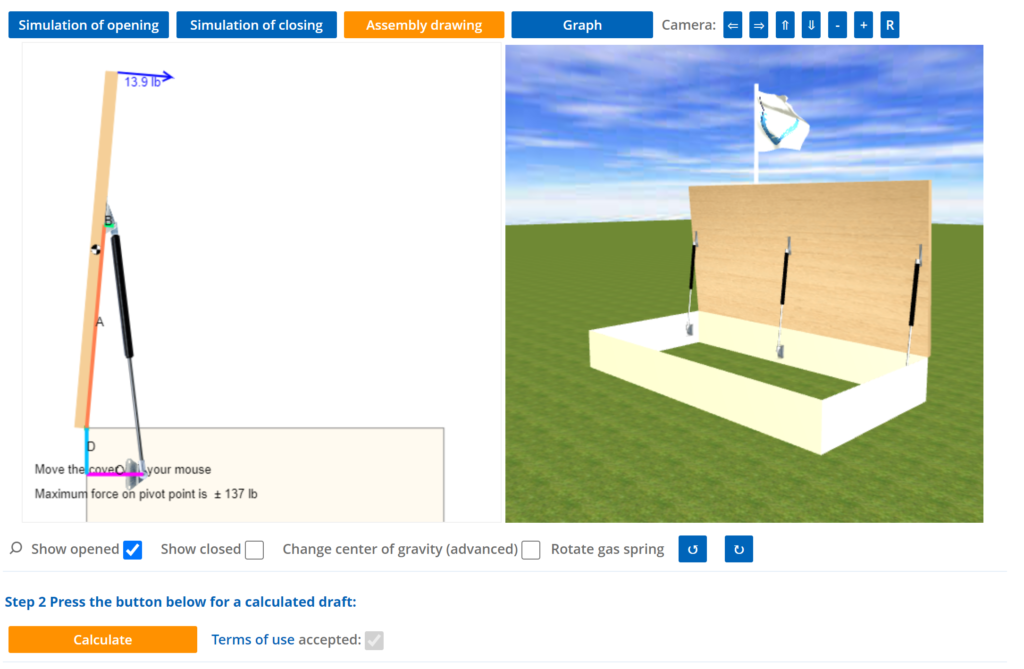
You can use our configurator tool to calculate which gas spring suits your application. Our configurator tool is super easy to use. All you need to do is enter the dimensions of your application, the rest happens automatically! And do you know what the best part is, besides that it is free to use? The gas spring from the result of the configurator tool can be ordered directly from the Gasspringsshop range, how cool is that! That way, you will know for sure that the gas spring suits your application. However, what to do when you are not familiar with all the details of your application? No problem, in that case you can use our calculator tool! This tool is super useful when you don’t know everything about your application yet. And we can hear you thinking: yes, this tool is also completely free to use!
Are you still not sure on how to use our tools? We have a very handy video – in which we explain how to use our calculator tool – for you right here.
Step 3: Ordering the gas spring and preparations
Are you satisfied with the outcome of your chosen tool? Then you can order your gas spring right away. Note: once you are satisfied with the outcome of the tool, it is important that you remember or write down the measuring points (which is part of the outcome of your chosen tool). You will need these measuring points later on in the installation process. It is also very important that you order some mounting parts for the gas springs. The tool of your choice will show you which mounting parts suit your gas springs.
Have you ordered your gas springs and mounting points? Great! Then let’s talk about preparations. You will need some tools for the gas spring installation. The image below shows all the possible tools for the gas spring installation. Some tools like a hammer or flashlight are optional. You may need these additional tools when your application is hard to reach, perhaps because it is located in a small space.

We want to make the gas spring installation as easy as possible for you. That is why we have summarized all the required tools / materials in the overview below. You can use it as a checklist. Useful!
- Gas spring(s)
- Mounting part(s)
- Screws (preferably stainless steel)
- Pencil
- Screwdriver (or a drilling machine)
- Tapeline
Step 4: Marking the screw points
Did you get all the necessary tools? Then it’s time to finally start with the gas spring installation. You should have memorized or written down the measuring points from your tool. Take your pencil and mark the measuring points on your application. It is extremely important that you do this very accurately, otherwise the gas spring may not fit in the end! The best way to do this is to put a dot on your application and then mark a light cross out of it. That way you always screw exactly in the middle of the measuring point.
Step 5: Gas spring installation
Have you marked the screw points correctly? And did you double check this? Then you are ready for the last step. Slide the gas springs into their extended state and drill a hole at the screw points. Now screw the mounting parts into the drilled hole. For the best results, we recommend using stainless-steel self-tapping screws.
Once you have installed the mounting parts on your application, all that is left to do is snapping the gas springs themselves into place. Place the end of the gas spring in the mounting parts with the narrow rod end lower than the gas-filled piston. When you hear – click – you know that the gas spring is correctly in place. The image below shows which direction you should hold the gas springs.

Do you want to save yourself a lot of trouble? Then execute the gas spring installation with another person. That way, one person can keep the application lid in position while the other person installs the gas spring!
Order your gas springs at Gasspringsshop
Are you ready to start with your own gas spring installation? Great!, then order your gas springs right away at Gasspringsshop.com. You can use our calculator / configurator tool to determine which gas spring is right for your unique application. Are you perhaps still not sure on how to use our tools or on how to install your gas struts? Then please don’t hesitate to contact us. We can help you find the right gas strut and mounting parts for every application! If you have any other questions, you can either take a look at our FAQ where a lot of questions are already answered or you can send an email to [email protected].

